
Achieving the perfect symbiosis between front-end and back-end development may seem unattainable, but the truth is that it can be done. And what a better example than Drupal 8 and jsPlumb our team used for developing one exciting project.
Our client needed a more efficient solution for adding various algorithms in the form of content on their website. By continuing to use the existing system they had implemented, the clients had to know all about HTML and it was both time-consuming and hard for the site moderators to add any new algorithms. Something had to be changed and that is what our team started doing.
Branislav Radovanovic and Marko Djuric, our experienced developers, explained the entire process if you wish to achieve the same results.
Why did we choose jsPlumb?
jsPlumb is an advanced, standards-compliant, and easy to use JS library for building connectivity based applications, such as flowcharts, process flow diagrams, sequence diagrams, organisation charts, etc. It can be used with Angular, React or Vue, or Vanilla JS.
For some of our older projects, our team has already used jsPlumb and they knew how powerful this library can be. And since they needed a library that was highly customizable and that was able to help them solve the clients’ biggest issue – this was an easy choice to make.
How did we solve the issue?
As we already mentioned, our team didn’t like the fact that the site moderators needed to know all about HTML to add new algorithms – so we developed a form for adding this content type. By doing this, anyone could use it without any knowledge about development, which decreased the time necessary for completing such a task.

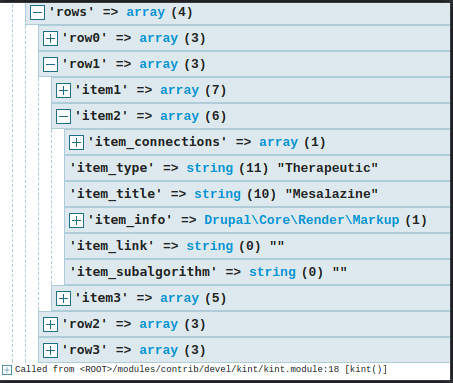
Each row represents a parent paragraph which can contain up to 6 boxes. The boxes are child paragraphs and they contain fields alongside all the necessary information about the items in that row needed for jsPlumb.

Each item (box) can contain unlimited number of connections to other boxes. Connections are third level paragraphs as well. The number of rows is also unlimited.
What did we do to make jsPlumb work properly?
First of all, we created a list of fields – each box needed to have a title, a type of box (this defines the style for the box and nothing else – eg. in case you want a different colour for each box), and a link field (in case there is need to link box to external/internal content or documentation).
Box can be referenced to a sub algorithm or any other algorithm as well, and we used entity reference field for this purpose.
We have also implemented an info field (a text area for short description for each box which opens up as a pop-up window).
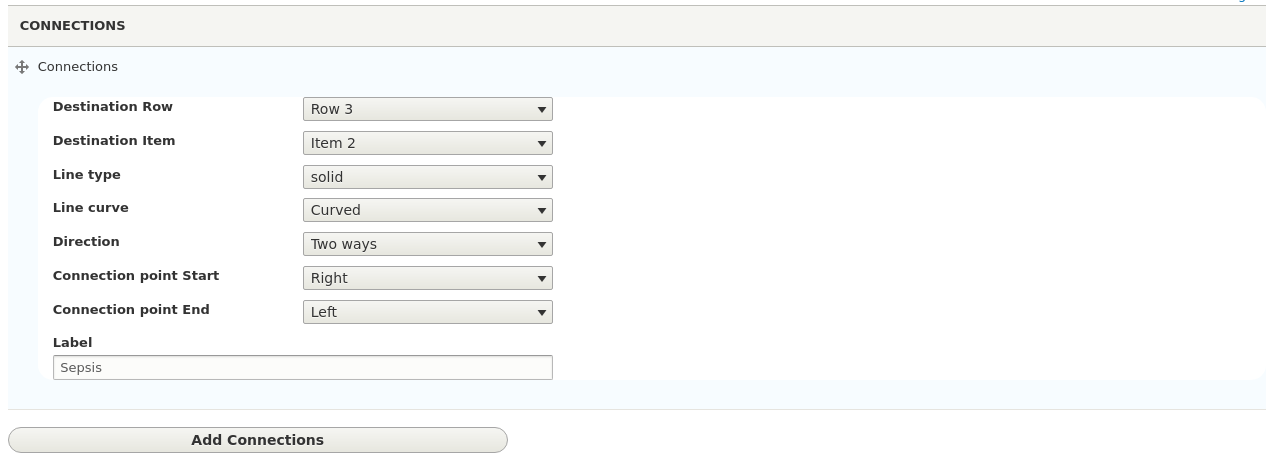
Finally, the most important set of fields we implemented were connections and without them jsPlumb would not be able to create connections between boxes. So we had:
- Destination Row (in which row the connection will end)
- Destination Item (to which item in a row the box is connected)
- Line type (line can be solid or dashed)
- Line curve (curved or straight)
- Direction (direction can be one way or two ways)
- Connection point Start (line can start from the left, right, top or bottom of the box)
- Connection point End (same as start connection can end from the left, right, top or bottom)
- Label (this can be used as a text on top of the line which connects the boxes)
Since we have all the necessary data from the user, it is time to move on to the custom module. So far the paragraphs have been extremely helpful. Now, when we have the data on the node itself, it is very easy to prepare variables for twig tpl and jsPlumb itself. Inside the module, the main function we work on is hook_preprocess_node() in which it is necessary to load all paragraphs from the parent one to the last child paragraph. In addition to this, it is necessary to extract their values and prepare them as variables for twig template. Several foreach loops and methods to get value do the job perfectly.

It was necessary to create a template file for our content type – algorithm: node--algorihtm--full.html.twig. With previously prepared variables in the custom module we can create HTML structure for jsPlumb inside the template file after this step.

Collaboration was the key to success
Without the proper communication between all members of the team, this project wouldn’t be so successful. Together, they performed detailed research and chose Paragraph module, jsPlumb and some custom coding as the most efficient solution. In this way, our team achieved impressive results in the shortest amount of time possible.
Interested in more Drupal development tips and tricks from our developers? Check out how to create a local Drupal 8 development environment via Docksal or how to make the most out of the Workspace module.


